
Posted on: March 13, 2026 By Bitaxemining Community Admin | Last Updated: April 20, 2026
This bitaxe setup guide will walk you through the steps to set up any bitaxe solo lottery miner, including supra, ultra, gamma, hex, and even octaxe. It includes the steps to power on your device, connect it to the 2.4 GHz channel of your WIFI router, and even get it connected to your Bitcoin wallet.
1- Power it On
To set up your new bitaxe, first plug it in. The full color LCD will turn on and display a QR code.
2- Connect to WIFI
To connect, scan the QR code with your phone. Sometimes my phone can’t actually scan the QR code on the device because it’s so tiny, but thankfully, there’s another way to connect your Bitaxe to your 2.4 WIFI network. On a computer, the miner will appear on your WIFI network as a hotspot named “NMAxe_xxxxx”. Connect to the WIFI hotspot that corresponds to your device name, and a browser window will open up with a configuration page to connect your bitaxe to a 2.4GHz WiFi network, as the device is compatible with this frequency only (If you purchased more than one bitaxe lottery miner, each one will have a unique hotspot so that you can tell them apart).
3- Configure the Device
Once connected to “NMAxe_xxxxx”, the configuration page appears. If the configuration page does not appear, you can access it manually by typing 192.168.4.1 into your browser. 192.168.4.1 is the default IP address for a freshly unboxed Bitaxe solo miner.
Most of the settings are pre-configured for ease of use. You will need to enter your WIFI network name (SSID) and WIFI password so the device can establish a connection, as shown below.
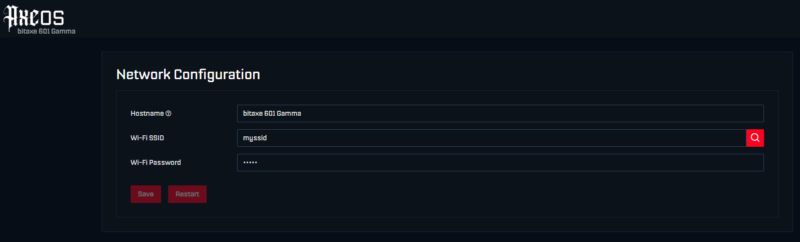
Upon entering your 2.4 GHz Wi-Fi credentials, hit “save” at the bottom left of the screen. You will then be prompted to restart your bitaxe for the changes to take effect.
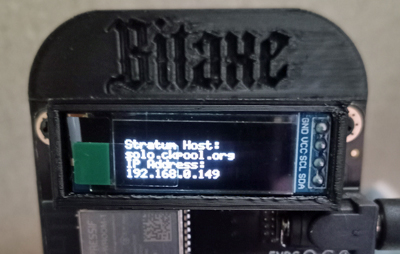
Give the device about 60 seconds to restart, and then access it by typing your device’s IP address into a browser window. This is no longer the default IP, but the specific IP address that is assigned to your device. Your device IP will be shown on the LCD screen of your Bitaxe miner, as shown below. The IP address for the device pictured is 192.168.0.149.
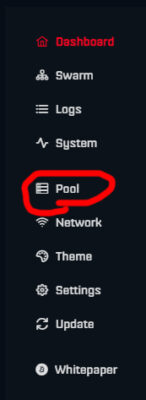
Upon typing your device IP into your browser window, a new window will open with options to complete the setup of your Bitaxe ASIC miner using the default UI, which is known as AxeOS. Click “Pool” on the menu,u which runs down the left side of AxeOS (as shown on the left).
For “Stratum US, er” copy and paste your crypto wallet address (as shown below); make sure it corresponds to the coin you are mining! If you do not yet have a crypto wallet, you can get a free cryptocurrency wallet from Trust Wallet, and they will provide you with a virtual (online) wallet address for free. If you are mining Bitcoin, just click on Bitcoin in the asset list within the Trust Wallet app, and then copy/paste your Bitcoin “Receive” address into AxeOS.
“Stratum URL” is the URL of
your mining pool. This typically defaults to CK Pool
or something similar, but you can replace this with a mining pool of your choice, such as the Axeminer solo mining pool.
The “Fallback” fields for “Stratum User” and “Stratum URL” are for your backup pool (in case the primary pool crashes). You would put your same wallet address and then your backup pool URL in these fields. If you don’t want to select a backup pool, just copy and paste the same “Stratum User” and “Stratum URL” from the “Primary” fields above it.
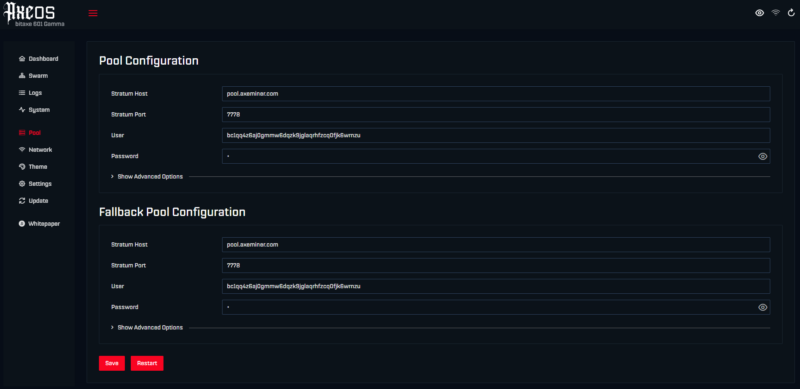
Next, fill in the port for the mining pool you have selected. Be sure to select the correct port based on the hashpower of your device; the mining pool website will show you which port corresponds to which devices. For example, in the Axeminer pool, port 7777 is for non-ASIC mining devices like Nerdminer or NMMiner, and port 7778 is for ASIC lottery miners, such as Bitaxe, Mars Lander, and NerdQaxe.
Lastly, fill in the password field. Unless otherwise specified by your mining pool, the password will typically be “X”. Then,n hit “Save”, after which you will be prompted to restart your device for the changes to take effect. Upon restarting, your device will come back up and begin mining within one to two minutes.
4- Start Mining
Upon restarting, your Bitcoin Lottery Miner will automatically start mining. If your device finds a Bitcoin block, the cryptocurrency will be automatically deposited into the wallet address you entered in the “Stratum User” field.
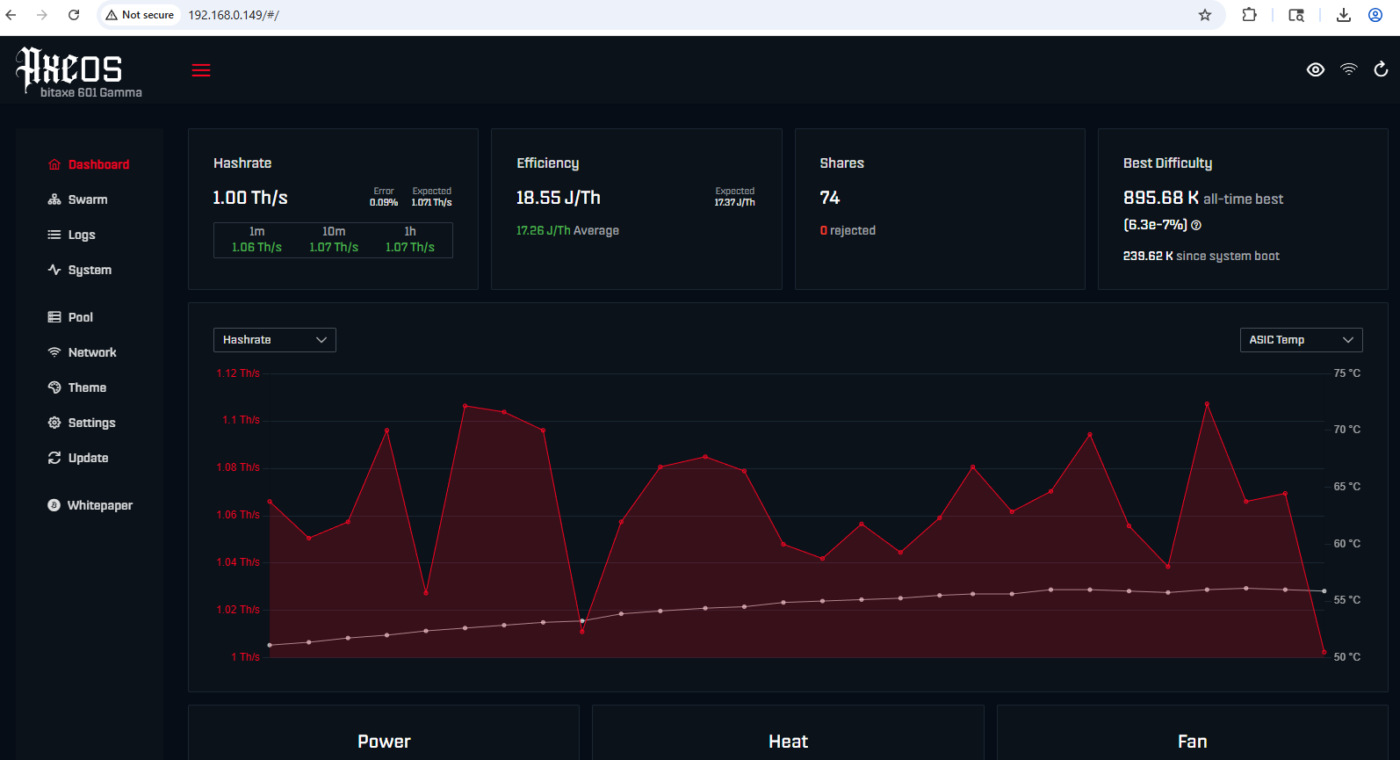
Once your device is configured, you will access your AXEos control panel by typing the IP address of your lottery miner into the address bar of your browser. Your device IP will be visible on the LCD display of your device once it’s been configured.
If you are using multiple devices, each of them will have a unique IP address. You can view the mining stats of all your devices simultaneously by clicking on “Swarm” on the panel menu at the top left of the AXEos control panel.
This is a lottery-style miner, also known as a solo miner (meaning payouts depend on finding a valid hash). It gives you a chance to earn real Bitcoin, but results are not guaranteed.*** Think of this sort of like buying a Bitcoin lottery ticket, except most lottery tickets expire immediately after the drawing, but this machine gives you access to a lifetime lottery for a one-time payment.
5- Watch Your Progress
The built-in LCD screen displays your mining progress in real-time, showing your hashrate and any Bitcoin you’ve earned. You can also check your mining stats by visiting the website for your mining pool and typing your Bitcoin receive address into the search bar, but keep in mind that pool stats are often not accurate. The most accurate hashing stats will always be on the new Bitaxe device itself.
We also have tutorials for setting up an NMMiner (Tiny USB miner) and Nan MMaxe (mini-ASIC miner).